
Traffic Zipper is an online marketing tool that allows you to automate your safelist mailing campaigns. It was created some time in the early 2000s by Michael Purvis, but for the last few years it has been run by Mike Bauer, who has brought it up to date and continues to maintain it.
I heard good things about the program from a marketers whose judgement I trust, so I decided to test the site at the beginning of 2023. I was quickly impressed with how easy it was to set up and how well it performed, so in Febrauary I added it to my Top5Programs list.
So, how can Traffic Zipper help you to improve your online business results?
The short answer is: by automating your safelist marketing campaigns.
In the back office of Traffic Zipper you can plug in over twenty of the best performing safelists.
Next, you can create one or more emails that you want the system to send to the safelists.
Then switch on the autopilot and Traffic Zipper will automatically send one of your emails (selected at random if you have more than one) to each of those safelists whenever possible, depending on the safelist mailing conditions (that is, how many credits you have, and how often you are permitted to send mails to each mailer).
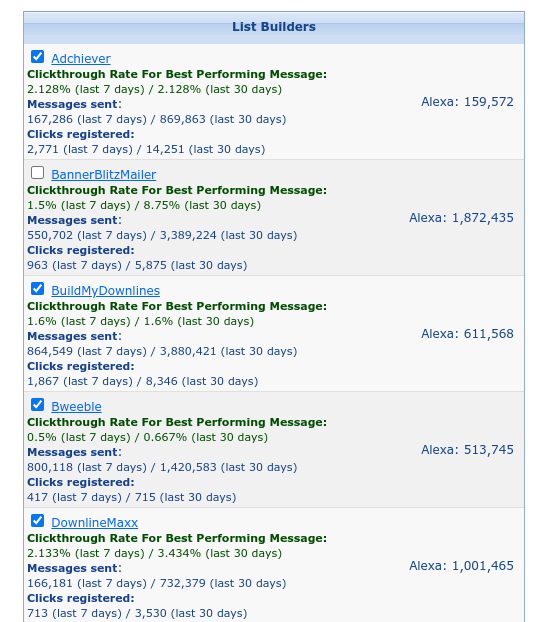
Step 1: Define Your List Builders
After you log in, hover your cursor over “My List builders” in the top menu and click on “Define My Listbuilders.” That will take you to a page that lists all the list builders you can use with Traffic Zipper. Tick the boxes of the ones you want to work with.
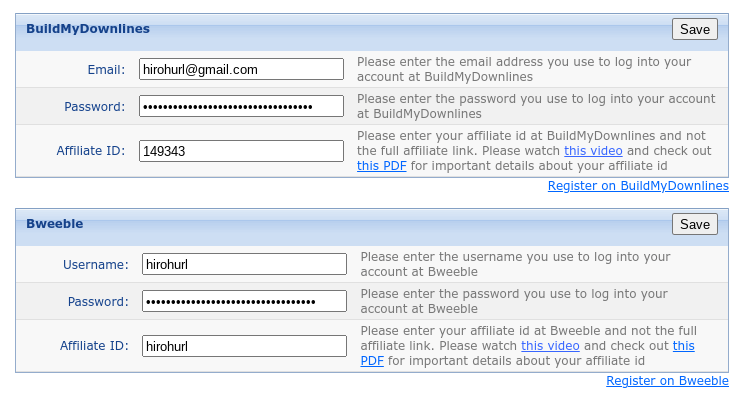
Step 2: Manage Your List Builder Details
Now hover your cursor over “My List builders” in the top menu and click on “Manage My Listbuilders Details.” On that page you will see all the list builders that you selected in Step 1. Fill in the forms and click the save buttons to link your list builder accounts to Traffic Zipper.
Step 3: Compose Your Email
Next, hover your cursor over “Send Email” in the top menu and click on “Compose Email.” If you are familiar with composing emails on safelists, the process will be familiar and easy. Enter your email Subject in the top field, the URL you are promoting in the next field, and your email message in the big field below that. Then click the Preview and then Send buttons when you are ready.
Step 4: Autopilot Setup
To automate your mailings, hover your cursor over “Send Email” in the top menu and click on “Autopilot Setup.”
Click the Edit icon by the email you want to mail out automatically, every time you’re able to mail. A list of your selected mailers will appear on the page. Select the ones you want to send the email out to (I select ALL of them) and then tick the “Use credits?” box to have your available credits applied to the mailing each time. Now click the “Turn On Autopilot” button, and everything is set up.

Now Traffic Zipper Will Send Your Emails On Autopilot
That’s all there is to it. Now Traffic Zipper will check each of the mailers and automatically send out your email whenever it is possible to do so.
You can check the “Sent Emails” and “Autopilot Tracking” pages to monitor the progress and the results of the automated mailings.
This program has made a massive difference to my safelist marketing and list-building efforts. Now, with zero effort, I never miss a mailing and my list is growing much faster than before.
If you value your time and want to get the best possible results from your safelist marketing efforts, join Traffic Zipper and put your campaigns on autopilot.
